Showing posts with label Blogger widgets. Show all posts

Wednesday, April 3, 2013

Recent Posts Widget With Thumbnails For Blogger!

Leave a Comment
Hi friends...Today I want to present to you a very nice Recent Posts widget that comes along with posts thumbnails and post summary as well. If you want to know how to add this Recent Posts widget/gadget to your Blogger blog, then follow the steps below:


recent posts, blogger widgets

How to Add the Recent Posts Widget to Blogger

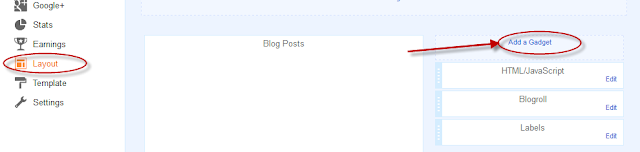
Step 1. Go To Blogger > Layout and click on "Add a Gadget" link


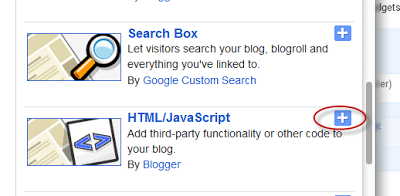
Step 2. From the pop-up window, scroll down and choose HTML/JavaScript


Step 3. Paste inside the empty box, the following code:


        -------------------------------HTML CODE------------------------------


                                              
Download HTML CODE:


      --------------------------------HTML CODE----------------------------
 

Step 4. Download Your HTML CODE And Change YOUR-BLOG/SITE-URL with the url address of your site/blog (ex: http://tricksweb.blogspot.com) and look to have no forward slash symbol "/" at the end of your url

Note:

  • To disable the scroll bar, remove the number 500
  • By default, this widget is set to display a maximum of 8 recent posts. To change this number, replace the number 8 with the number of posts desired
  • if you want only the posts titles to appear, change true to none and "0" from padding-top:0px with 10

Step 5. Save your widget. And you're done!


free-10rs-recharge

If you need more help, leave your comment below.
Read More...

Monday, March 25, 2013

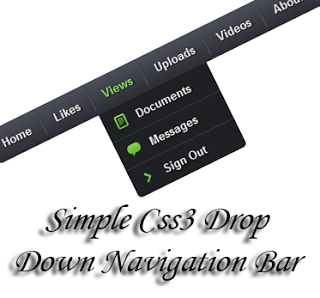
Css3 Drop Down Navigation Menu For Blogger!

Leave a Comment
We Are Come Back With How to add simple Css3
drop down menu bar for your blogger. There are small
icons on sub menu. This menu bar works with every
internet browsers.You can link with your main pages
by using this navigation. Im using Css3 and HTML,
Just check out demo.Its easy to add to blogger get my
all menu bar here.....


                                   Demo

1. Log in to blogger account and Click drop down.
blog-post-option


2. Now select "Template" Like Below.


Select-template

3. Now you can see Live on blog, Click EDIT HTML Button"

4. Now click Proceed button.

5. Find this tag by using Ctrl+F ]]>

6. Paste below code Before ]]> tag

-------------------------------------HTML CODE-----------------------------------------
 
/* The CSS Code for the menu starts here tricksweb.blogspot.com */
.btrix_menu,.btrix_menu ul,.btrix_menu li,.btrix_menu a {
margin: 0;
padding: 0;
border: none;
outline: none;
}
.btrix_menu {
height: 40px;
width: 525px;
background: #4c4e5a;
background: -webkit-linear-gradient(top, #4c4e5a 0%,#2c2d33 100%);
background: -moz-linear-gradient(top, #4c4e5a 0%,#2c2d33 100%);
background: -o-linear-gradient(top, #4c4e5a 0%,#2c2d33 100%);
background: -ms-linear-gradient(top, #4c4e5a 0%,#2c2d33 100%);
background: linear-gradient(top, #4c4e5a 0%,#2c2d33 100%);
-webkit-border-radius: 5px;
-moz-border-radius: 5px;
border-radius: 5px;
}
.btrix_menu li {
position: relative;
list-style: none;
float: left;
display: block;
height: 40px;
}
.btrix_menu li a {
display: block;
padding: 0 14px;
margin: 6px 0;
line-height: 28px;
text-decoration: none;
border-left: 1px solid #393942;
border-right: 1px solid #4f5058;
font-family: Helvetica, Arial, sans-serif;
font-weight: bold;
font-size: 13px;
color: #f3f3f3;
text-shadow: 1px 1px 1px rgba(0,0,0,.6);
-webkit-transition: color .2s ease-in-out;
-moz-transition: color .2s ease-in-out;
-o-transition: color .2s ease-in-out;
-ms-transition: color .2s ease-in-out;
transition: color .2s ease-in-out;
}

.btrix_menu li:first-child a { border-left: none; }
.btrix_menu li:last-child a{ border-right: none; }

.btrix_menu li:hover > a { color: #8fde62; }

.btrix_menu ul {
position: absolute;
top: 40px;
left: 0;
opacity: 0;
background: #1f2024;
-webkit-border-radius: 0 0 5px 5px;
-moz-border-radius: 0 0 5px 5px;
border-radius: 0 0 5px 5px;
-webkit-transition: opacity .25s ease .1s;
-moz-transition: opacity .25s ease .1s;
-o-transition: opacity .25s ease .1s;
-ms-transition: opacity .25s ease .1s;
transition: opacity .25s ease .1s;
}

.btrix_menu li:hover > ul { opacity: 1; }
.btrix_menu ul li {
height: 0;
overflow: hidden;
padding: 0;
-webkit-transition: height .25s ease .1s;
-moz-transition: height .25s ease .1s;
-o-transition: height .25s ease .1s;
-ms-transition: height .25s ease .1s;
transition: height .25s ease .1s;
}
.btrix_menu li:hover > ul li {
height: 36px;
overflow: visible;
padding: 0;
}
.btrix_menu ul li a {
width: 100px;
padding: 4px 0 4px 40px;
margin: 0;
border: none;
border-bottom: 1px solid #353539;
}
.btrix_menu ul li:last-child a { border: none; }
.btrix_menu a.documents { background: url(https://blogger.googleusercontent.com/img/b/R29vZ2xl/AVvXsEiOGt4fJlCCY6zIBWm7YMgALH3wob3qq_QUp3GbugNIP78li_PyXyJ01tcUzZUazsEVaWwwbOI9ENefeknXfWX0rbLWzUKL99RRFw4ttStglf5_vmZYoSbQn630pkxkd5SbCSBOk_uwHcs4/s1600/docs.png) no-repeat 6px center; }
.btrix_menu a.messages { background: url(https://blogger.googleusercontent.com/img/b/R29vZ2xl/AVvXsEh5PhaEgMNPC0aNQgLzxWu2cr3EI3zXBa9-FagEJ1OybFe5SH5qYPoeHMs_RlIysX27cQxqxECH0JWxoz5kZmGiVb94ttj7EuWhqvXyZt8AVrOHJ-TGatLfC01iZ_uEYMU_xbScBxnKPwQw/s1600/bubble.png) no-repeat 6px center; }
.btrix_menu a.signout { background: url(https://blogger.googleusercontent.com/img/b/R29vZ2xl/AVvXsEjQrdIM84uDYeIEidV1MhIf6JsQINakMA8OKnMZbDk6_0ru5vnUR7WkdH4c3JQOinpwvad-138w6vhowAxIeq638o6Ju39BF6iAHKskntZzcOKkKPC8KKcYeLe-CJEpfmM1BOq-Wn6C0VAE/s1600/arrow.png) no-repeat 6px center; }

----------------------------------------HTML CODE----------------------------------


7. Go to blogger and click Layout

8. Click Add Gadget and select 'HTML/Javascript

9. Download and Paste below code.


                                                                       Download CODE :


Replace # with your links.

10. Now save your HTML/JavaScript'.

You are done...
Read More...

Wednesday, March 20, 2013

One Time Pop Up Subscription Widget For Blogger

Leave a Comment

onetime-email-subscription-popup-box-blogger

Onetime Popup Feedburner Subscription Widget for Blogger

Your Blogger blog needs an email subscription widget on it to perform well because your regular visitors, who love your content, would never want to miss your latest posts and you can make their task easy by allowing them to subscribe your blog through email subscription. By doing this, you make it sure that your visitors can visit you constantly. Feedburner is a great service by Google which delivers your content to your subscribers effectively. Onetime Popup Feedburner Email Subscription Widget will make your dream true to add a stylish and effective popup email subscription box to your Blogger blog. As the popup is onetime, so it guarantees that your visitors will never experience it irritating. It will appear once and never popup again for the same visitor from the same computer. Onetime Popup Email Subscription widget sets a cookie in the targeted visitor and once it has appeared for the visitor, later on it recognizes the visit and don't bother to popup again. So your subscribers number will effectively increase and as a result, your traffic will keep growing day by day. Additionally, your regular visitors will stay in touch with your blog whenever you will post something new.

How to Add Onetime Popup Email Subscription Box to Blogger

1. Login to your Blogger dashboard, choose your blog and go to its layout
2. Add a new HTML/JavaScript gadget with the below code


GET FREE EMAIL UPDATES


Join us for free and get valuable content delivered right in your inbox.


supportivehands
', 'popupwindow', 'scrollbars=yes,width=550,height=520');return true" target="popupwindow">


supportivehands" />


2. Replace blue highlighted value with your Feedburner ID and save the gadget. You are all done!!!

If the Email Subscription Box doesn't popup, then it might be possible that you have Ajax JQuery script in your template already. To fix it, remove the red highlighted line from above code.
Read More...

Monday, March 4, 2013

Top 5 Smarter Related Post Widgets For Blogger!

Leave a Comment
related post widget


You all may be using related posts widget for blogger in your blogs. Sometimes you may be using its text version and some may use thumbnail style related posts widget on their blogs. we found top 5 related posts which you can use in your blogs.


The top 5 of them are :

Linkwithin

You can add the linkwithin widget on your blog by without a sign up and its so easy to install. It will install automatically on the post footer and it doesn't need much expert support.

                                                        click here to go


NRelate

This is another favorite widget which don't require you to sign up if you don't want the advance design/options. The setting up process is very similar to LinkWithin but you get lot more control over your widget and you can even earn money showing advertise with it.

                                                        click here to go
  

Outbrain

This is just similar to nRelate. It helps you earn by advertising and most importantly, you can customize its css manually.

                                                       click here to go 


More Tech tips

This widget has been created  by an awesome blogger and its a nice looking widget. You must be well known with css and HTML for installing the widget.

                                                       click here to go


Blogger Bin

Blogger Bin related posts widget comes with nice CSS effects. This doesn't contain effects as it is just the text version anyway, its a nice one.

                                                      click here to go


These are all my favorite related posts plugins and use anyone you like. We prefer Linkwithin. If you had found anything new related to the topic that we had discussed, please inform me with the comment box.
Read More...

Tuesday, February 19, 2013

5 In 1 Social Networking Slide Outs Widget For Blogger!

Leave a Comment

Today I'm going to share Awesome blogger widget that contain all the 5 Big Social Network (Facebook, Twitter, Google Plus, Email Subscribe, YouTube) jQuery Slide Out Widget For Your Blog & Website To Increase Your Social Fans.
So we have five different Pop up Like Boxes which appears on hover on little image that are at right sidebar on you blog.

One of the best ways to increase your Social fans is to add the Jquery Pop-up Social Box to your Blog. Once this widget is installed on your blog, your visitors will be shown a slide out box with the option to like your Facebook Page, or want to follow on Twitter, or want to add you in there circle, want to subscribe your feedburner email whenever they visit your blog. Advantages this widget is to free space on the page. Because if you add all of these widget on your site/blog, it will take a huge space that will make your visitor angry, It can prevent website normal as the box. Static widget as soft box with jQuery effect of activation for the blogger, this is another cool control. Here I have added as the box with simple jQuery hover effect. Let add this cool widget through below Widget Generator.


Live Preview

Live Demo

Features:

  • 1.) J-Query/JavaScript Widget.
  • 2.) Slide-Out On Hover.
  • 3.) Awesome And Stylish.
  • 4.) Facebook Like Box Included.
  • 5.) Twitter Followers Box Included.
  • 6.) YouTube Subscribe Box Included.
  • 7.) Google Plus Add To Circle Widget Included.
  • 8.) FeedBurner RSS Subscribe Through E-Mail Widget Included.
  • 9.) Sliding Effect Enabled.
  • 10.) Slide Out On Hove And Get Back On Mouse Out.

How To Add This Gadget To Blogger?

  • 1. Replace my User name with yours in below widget generator
  • 2. Click Generate Button
  • 3. Check Live Preview by clicking Preview button
  • 4. Now finally Click ADD TO BLOGGER to add this widget on your blog

5 in 1 Social Subscribing Slide Out Widget Generator

With the help of Blow Widget Generator you will easily add 5 in 1 Social Subscribing Slide Out Widget into your blog or website.


Login To Your Blogger Account Before Using Widget Generator..


Credits: Widget Genetator Credits To NBT.

Read More...

Wednesday, February 6, 2013

Email Subscription Widget For Blogger!

Leave a Comment
It becomes kind of troublesome if any user wishes to read your new posts, but he/she doesn't actually know when do you update your blog/website. If you update your blog weekly, it will terribly awful user experience if that visitor surfs your blog everyday and finds no update.

subscribe via email widget
This is how our Email Subscription Form will look like
In such cases, we have a better option, "Subscribe via Email". This will drop an email in user's inbox whenever you publish a new post. This is good for you since each of new posts will be read by your targeted audience(subscribers). And its good for visitor too since he/she doesn't have to visit your blog now and then to check if you have updated it or not.


', 'popupwindow', 'scrollbars=yes,width=550,height=520');return true">

TricksPassion" name="uri"/>


Just copy the code and paste it in the HTML/JavaScript of your blog by using Add a new widget in Layout in Blogger.

Make sure you change the following:

http://feedburner.google.com/fb/a/mailverify?uri=TricksPassion 
to
http://feedburner.google.com/fb/a/mailverify?uri=YOUR_FEED_ID_HERE 

and 

value="TricksPassion"  to value="YOUR_FEED_ID_HERE"

See the following Screenshot to know how to get your blog's feed id.
Click on  the image to enlarge

Note : trickspassion.blogspot.com  is also my website......


Read More...

Monday, January 28, 2013

How to change Blogger favicon easily

Leave a Comment


The new Blogger Dashboard allows you to change your blog’s favicon with a few clicks. The feature has been around for a while now and most of you might already be using it.This tutorial is for the ones who don’t.
If you are not sure, what a Favicon is then refer this image:
image
The default Blogger Favicon looks like this :You can replace it with some other icon of your choice.

How to change the Blogger Favicon without any Code Edits

1. Login to your Blogger Dashboard and navigate to Design > Page Elements.
2. Click on the Edit link next  to the Favicon element
https://lh5.googleusercontent.com/k9O8N5Bjn_UJykwz0oZjyVkID28w2WzKgtxiWrfkE_1L5_jh7TBRUPKUX0jXM8LbSaAAlQ3rwX0jXtJ2kRtspuLOiYvAsGIW5nvpN_VbXbeBwh_bmCk
3. Click the Browse button and select the appropriate favicon which you already have on your computer.
image 
4. Once it is uploaded, you will see the Favicon and a Remove link next  to it. Click on theSave button
image
5. Save the Changes and you are done.
image

Common Questions

1. I changed the favicon, but it is still showing the old favicon.Why?
Just clear your browser cache, and reload your blog once or twice. It should now work.
2. Does it support only icon files?
You can use other images as well. Blogger will automatically resize them and convert them into the icon format. But the image should be less than 100kb.
3. Where can I download Favicons from?
http://www.iconspedia.com/ Just download the .ico version of the icon. You can download the 16x16 version of the icon if available. You will find lots of similar sites if you do a Google Search.
Read More...

Get fresh content daily undefinedit’s free)

subscribe

Get all Blogging Secret Revealed Direct to Your Inbox. Join Thousands of
People. We Do Not Spam! Your Privacy and Email Address are Safe With Us!